Wednesday, July 30, 2014

Churro Chex Mix (Recipe)

This past weekend, I attended a Mexican-themed potluck. Since I was late to step up to the plate, all of the classic Mexican entrées were already taken and so I decided to tackle a Mexican dessert. I figured that churros -- those long, deep-fried doughnut tasting treats covered in cinnamon and sugar -- would be a big hit, and so I began searching for recipes. Given that I had little time to make these, I searched for a different take on the classic churro. This is when I stumbled upon a recipe for Churro Chex Mix. It looked easy enough, yet delicious, and so I went with it!

Basically, this recipe takes all that sweet goodness from the churro and transforms it into a no-bake, bite-sized, mouth-pleasing replica. Not only are these a sugar lover's dream come true, they are a no-bake, quick-and-easy sweet treat for all. They were definitely a big hit at the potluck and were truly addictive. Caution: once you start, you just can't stop!

Ingredients:

9 cups Chex cereal (*I used rice Chex)
2 cups cinnamon chips (*I couldn't find cinnamon chips anywhere, and so I got butterscotch chips instead, which I think were equally delicious, if not more!)
1/4 cup butter
1 cup powdered sugar
1/2 cup granulated sugar
1 1/2 tsp ground cinnamon (*I increased the cinnamon to 1 tbsp since I didn't use cinnamon chips)

Directions:
  1. Pour cereal into a large bowl, set aside. 
  2. Mix sugars and cinnamon together in a small bowl and set that aside too.
  3. Melt cinnamon (or butterscotch) chips and butter in microwave for 30 seconds, then stir. Put back in for another 10 seconds and stir again until smooth. If you have to heat it again, just do it for 10 seconds so as not to overheat it.
  4. Pour over cereal mixture and mix until the cereal is all coated. 
  5. Slowly add half of the sugar mixture to the cereal while tossing. Coat the whole mixture and then lay it on wax paper on the countertop. 
  6. Sprinkle the rest of the sugar mixture on top and let it cool before serving or storing.
Yields: Serves a party of 15 (with leftovers)

Verdict: Indulgent and highly addictive...great for a party!

Total Prep Time: 20 minutes

Rating: 9/10

Thursday, July 10, 2014

St. Martha's Brasserie d'Orleans (Review)

As we all know, the culinary scene in Ottawa has come alive in recent years, with a thriving community of top chefs, creative restaurants, and unique foodie ideas. While the majority of the city’s simmering culinary landscape is located in the downtown core, there are a few hidden gems located in the suburbs.

Tucked away in Orleans, camouflaged amongst the many fast-food chains, Chinese takeout, pubs, and pizza places, is a restaurant unlike the strip’s other eateries. St. Martha's Brasserie d'Orleans, which opened in 2012, is a breath of fresh air in the eastern burbs.

The restaurant defines its food and service as 'rustic refinement', whose menu features classic French brasserie fare. Dishes include cassoulet, steak frites, gigot d’agneau, and poached salmon with a beau béarnaise sauce, as well as thin crust pizza and a killer burger and frites. And of course a brasserie wouldn't be a brasserie without beer! They offer a wide selection of locally brewed beer from Eastern Ontario and Western Quebec, as well as several Ontario regional wines. The brasserie prides itself on its fresh, local ingredients and its modestly priced, yet delicious menu.

In spite of this, during my first visit, I was somewhat underwhelmed by the small 50 seat restaurant, whose decor and ambience did little to impress me. The service was also not as hospitable or friendly as the restaurant boasts, however, the food itself made up for it. The extensive menu of wholesome fresh food made it difficult to choose an entrée, but I decided to go on the healthier side and ordered the St. Martha's salad for $17.

The salad consisted of mixed greens on a bed of warm quinoa with goat cheese, grilled chicken breast, dried figs, toasted walnuts and lemon vinaigrette. I also had the option to choose two different salad combinations, either pan-seared AAA Ontario flank steak served with oven dried cherry tomatoes, cucumber and maple/mustard vinaigrette, or grilled salmon brushed with black garlic pesto, capers, toasted pine nuts and lemon vinaigrette. But I was very satisfied with my grilled chicken choice.

My other dining companions went with the Vegetarian Lasagna ($17), the Rainbow Trout ($22) and the Lobster Risotto ($27). I, of course, tasted a bite of each, and was very impressed by all dishes. The Vegetarian Lasagna consisted of ricotta, tomato sauce, spinach, mushrooms and eggplant smothered with mornay sauce and Gruyère cheese then baked and topped with fresh basil. The Rainbow Trout was grilled and served with a cranberry and lemon riced cauliflower, glazed carrots drizzled with a balsamic fig reduction. Finally, the decadent Lobster Risotto was infused with saffron, white wine and cream, and garnished with two butter-poached lobster claws.

Vegetarian Lasagna
Rainbow Trout
Lobster Risotto
All in all, the food was delicious and satisfying. I was impressed by the bold flavours and creativity. Next time I return, I will try the Chef's Special, which is an innovative and seasonally inspired dish that changes weekly. 

Verdict: 7/10...great food, but mediocre service and atmosphere.

Hours: Monday to Friday: 11:00am - 10:00pm; Saturday and Sunday: 9:00am - 10:00pm - Special Brunch menu on the weekend

Price: $15-$28

St. Martha’s Brasserie d’Orléans, 503 — 3095 St. Joseph Blvd., Orléans, ON
stmarthasbrasserie.com

Wednesday, July 9, 2014

Brownie-Bottom Coconut Chocolate Cream Cake (Recipe)

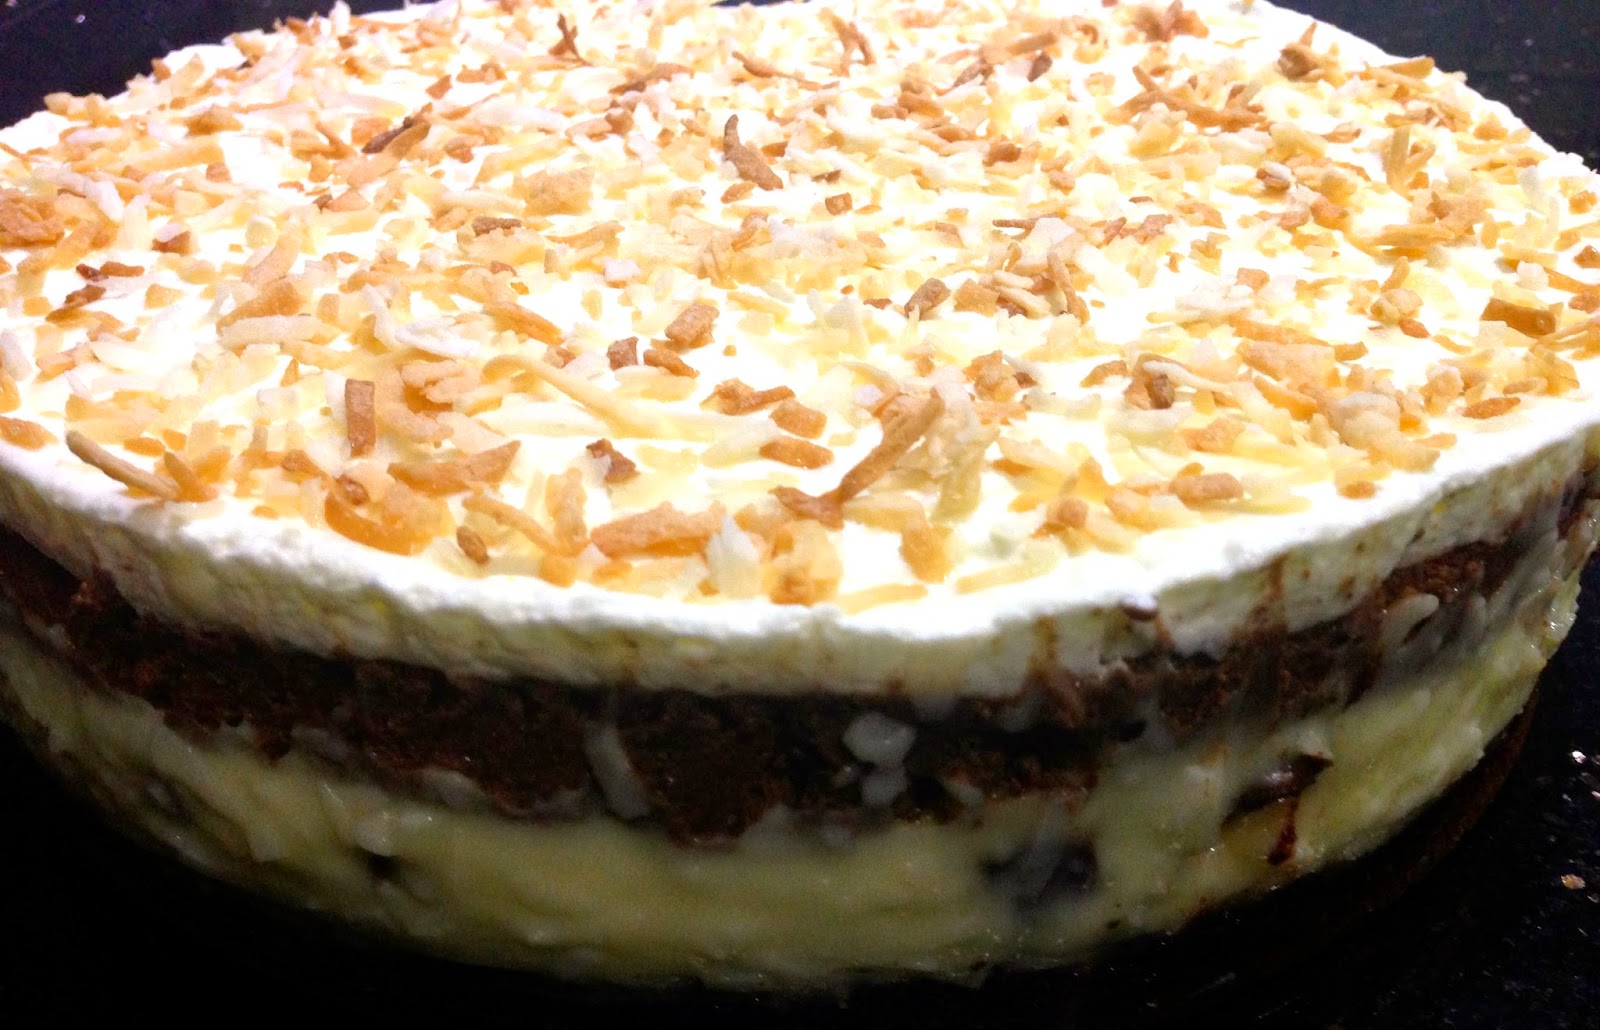
Another birthday...another cake! In celebration of my mother's birthday, I made her a Brownie-Bottom Coconut Chocolate Cream Cake. Since my mother loves all things coconut, I always try to find a new and original way to incorporate it into a mouthwatering creation. And this one did not disappoint. It was deliciously sweet and a delight for the tastebuds. 

Four layers make up this culinary masterpiece: moist chocolate brownie lines the bottom, which is topped with decadent coconut cream, followed by heavenly chocolate mousse and a final layer of fresh whipped cream and toasted coconut.

This cake is extremely easy to make, however, it does require a lot of time. Three of the four layers should be made on different days in order to give each layer enough time to set. I would recommend making the brownie and coconut layer one day, the chocolate mousse layer on day two, and then topping and serving the cake on day three.

Ingredients:

Brownie Layer
1 recipe of your favourite brownies (baked in a 9-inch springform pan)
*Since I was short on time, I used a pre-made brownie-mix.

Coconut Cream Filling
1 1/2 cup half-and-half
1 1/2 cup coconut milk
2 eggs
3/4 cup white sugar
1/4 cup plus 4 teaspoons cornstarch
1/4 teaspoon salt
3/4 cup flaked coconut
1/4 teaspoon coconut extract
1/4 teaspoon vanilla extract
2 tablespoons semisweet chocolate chips

Chocolate Mousse
4 ounces semisweet chocolate chips
1/3 teaspoon vanilla extract
1 cup chilled whipping cream
2 tablespoons icing sugar
1/2 teaspoon gelatin
1 1/2 teaspoon cold water

Whipped Cream Topping 
3/4 cup chilled heavy whipping cream
2 tablespoons icing sugar
3/8 teaspoon gelatin
1 1/8 teaspoon cold water
Toasted coconut

Directions:

Brownie Layer
  1. Bake brownie recipe of your choice in a 9-inch springform pan.
  2. Remove from oven and let cool completely.
Coconut Cream Filling
  1. Combine the half-and-half, coconut milk, eggs, sugar, cornstarch, and salt in a medium microwave-safe bowl. 
  2. Microwave it for 6-8 minutes, whisking well after each minute, until it’s thickened.
  3. Once the mixture is thickened, add coconut extract, vanilla extract and the coconut and stir. 
  4. Pour half of this filling over your brownie layer, sprinkle on the 2 tablespoons of chocolate chips, and then pour the rest of the filling. 
  5. Place in the fridge to chill until firm, about 2 to 4 hours.
Chocolate Mousse
  1. Place the semisweet chocolate chips in a medium bowl. 
  2. Bring 1/3 cup cream to boil in a microwave-safe dish in the microwave. Pour it over the chocolate and let it sit for 2 minutes before gently whisking it to a smooth ganache. Cool to room temperature, stirring occasionally.
  3. Place cold water in a small dish and sprinkle gelatin over it to soften for 10 minutes. Heat it for 30 seconds in the microwave and whisk it with a fork to dissolve the gelatin. 
  4. In a chilled mixing bowl, beat 2/3 cups cold whipping cream and icing sugar in to stiff peaks, adding gelatin mixture and vanilla extract halfway through. 
  5. Fold the cream into the chocolate mixture and pour the mousse onto set coconut filling. 
  6. Chill until set, about 6 hours or overnight.
Whipped Cream Topping
  1. Place cold water in a small dish and sprinkle gelatin over it to soften for 10 minutes. Heat it for 30 seconds in the microwave and whisk it with a fork to dissolve the gelatine. 
  2. In a chilled mixing bowl, whip the cream and icing sugar to stiff peaks, adding gelatin mixture halfway through. 
  3. Top the cake with the whipped cream and sprinkle with toasted coconut.
*To toast coconut, preheat oven to 350, spread coconut onto a cookie sheet and bake for 10 minutes, or until browned. 

Place the cake in the fridge until ready to serve. When removing the cake from the springform pan, be careful, as it can easily lose its shape. 

Yields: 10-12 servings

Verdict: Sweet, sweet, sweet! But it turns any frown upside down!

Total Prep Time: 3 hours
Baking Time: 30 minutes (for brownies)

Rating: 8.5/10